Introduction
When the computer was invented, another name for it was Calculator because it could only count at that time. I think there is nothing new to say about this. There are two types of calculators: a standalone machine with many of hardware buttons and a computer or mobile application program.
In this section, we will build a Basic Calculator Application using Python language. Lastly, we will convert the program into an executable file(for both Windows and Linux), so that it becomes easy for everyone to use.
👉Visit Also: AGE Calculator in Python - Tkinter Project
Requirements and Installation
We'll add a nice graphical interface to this calculator program using the Tkinter library. So, install this library if you didn't already.
Code
The code is quite straightforward, I hope you will easily grasp the logic of this program once you see it.
 '''Python Project: Basic Calculator in Python using Tkinter'''

from tkinter import *

class Calculator:
    def __init__(self, root):
        self.root = root
        self.root.title("Calculator")
        self.root.geometry("400x450+400+100")
        self.root.maxsize(400, 450)
        self.root.config(bg="white")

        self.old_value = False

        self.Entry_Value = StringVar()
        self.Entry_Value.set("")

        self.Entry_Field = Entry(self.root, textvariable = self.Entry_Value, \
        justify ='right', font=("Calibri",18))
        self.Entry_Field.grid(columnspan= 4, ipadx= 46, ipady= 40)

        Button_blank = Button(self.root, text= '  ', height= 3, \
        width = 7, fg = 'white', bg = 'gray35')
        Button_blank.grid(row= 1, columnspan= 3, ipadx= 100, ipady= 0)

        # Clear Button
        Button_clear = Button(self.root, text= ' CLR ', \
        command = lambda: self.on_press("CLR"), height= 3, width = 7, \
        fg = 'white', bg = 'gray35')
        # Grid Row 1 and Column 3
        Button_clear.grid(row= 1, column= 3)

        Button_7 = Button(self.root, text= ' 7 ', \
        command = lambda: self.on_press(7), height= 3, width = 7, \
        fg = 'white', bg = 'gray50')
        # Row 2 and Column 0
        Button_7.grid(row= 2, column= 0)

        Button_8 = Button(self.root, text= ' 8 ', \
        command = lambda: self.on_press(8), height= 3, \
        width = 7, fg = 'white', bg = 'gray50')
        Button_8.grid(row= 2, column= 1)

        Button_9 = Button(self.root, text= ' 9️ ', \
        command = lambda: self.on_press(9), height= 3, \
        width = 7, fg = 'white', bg = 'gray50')
        Button_9.grid(row= 2, column= 2)

        # Divide Button
        Button_div = Button(self.root, text= ' ➗ ', \
        command = lambda: self.on_press("/"), height= 3, \
        width = 7, fg = 'white', bg = 'gray35')
        Button_div.grid(row= 2, column= 3)

        Button_4 = Button(self.root, text= ' 4 ', \
        command = lambda: self.on_press(4), height= 3, \
        width = 7, fg = 'white', bg = 'gray50')
        Button_4.grid(row= 3, column= 0)

        Button_5 = Button(self.root, text= ' 5 ', \
        command = lambda: self.on_press(5), height= 3, \
        width = 7, fg = 'white', bg = 'gray50')
        Button_5.grid(row= 3, column= 1)

        Button_6 = Button(self.root, text= ' 6 ', \
        command = lambda: self.on_press(6), height= 3, \
        width = 7, fg = 'white', bg = 'gray50')
        Button_6.grid(row= 3, column= 2)

        # Multiply Button
        Button_mul = Button(self.root, text= ' ✖️ ', \
        command = lambda: self.on_press("*"), height= 3, \
        width = 7, fg = 'white', bg = 'gray35')
        Button_mul.grid(row= 3, column= 3)

        Button_1 = Button(self.root, text= ' 1 ', \
        command = lambda: self.on_press(1), height= 3, \
        width = 7, fg = 'white', bg = 'gray50')
        Button_1.grid(row= 4, column= 0)

        Button_2 = Button(self.root, text= ' 2 ', \
        command = lambda: self.on_press(2), height= 3, \
        width = 7, fg = 'white', bg = 'gray50')
        Button_2.grid(row= 4, column= 1)

        Button_3 = Button(self.root, text= ' 3 ', \
        command = lambda: self.on_press(3), height= 3, \
        width = 7, fg = 'white', bg = 'gray50')
        Button_3.grid(row= 4, column= 2)

        Button_min = Button(self.root, text= ' ➖ ', \
        command = lambda: self.on_press("-"), height= 3, \
        width = 7, fg = 'white', bg = 'gray35')
        Button_min.grid(row= 4, column= 3)

        # Point Button
        Button_point = Button(self.root, text= ' . ', \
        command = lambda: self.on_press("."), height= 3, \
        width = 7, fg = 'white', bg = 'gray50')
        Button_point.grid(row= 5, column= 0)

        Button_zero = Button(self.root, text= ' 0 ', \
        command = lambda: self.on_press(0), height= 3, \
        width = 7, fg = 'white', bg = 'gray50')
        Button_zero.grid(row= 5, column= 1)

        # Equals Button
        Button_equal = Button(self.root, text= ' = ', \
        command = lambda: self.on_press("="), height= 3, \
        width = 7, fg = 'white', bg = 'orange')
        Button_equal.grid(row= 5, column= 2)

        # Plus Button
        Button_plus = Button(self.root, text= ' ➕ ', \
        command = lambda: self.on_press("+"), height= 3, \
        width = 7, fg = 'white', bg = 'gray35')
        Button_plus.grid(row= 5, column= 3)

    def on_press(self, txt):
        if txt == "=":
            if self.Entry_Value.get().isdigit():
                result = int(self.Entry_Value.get())
            else:
                try:
                    # eval function is used for evaluate expressions
                    # in Python
                    # This is the main part of this program.
                    # This is used for the calculation.
                    result = eval(self.Entry_Field.get())
                except:
                    result = "Error"

            self.Entry_Value.set(result)
            self.Entry_Field.update()
            self.old_value = True
        elif txt == "CLR":
            self.Entry_Value.set("")
            self.Entry_Field.update()
        else:
            if self.old_value is False:
                self.Entry_Value.set(self.Entry_Field.get()+ str(txt))
                self.Entry_Field.update()
            else:
                self.Entry_Value.set("")
                self.Entry_Field.update()
                self.Entry_Value.set(self.Entry_Field.get()+ str(txt))
                self.Entry_Field.update()
                self.old_value = False

if __name__ == "__main__":
    root = Tk()
    obj = Calculator(root)
    root.mainloop()
Output
Download the Source Code
You can download the Source Code of this Project directly from my GitHub page through the download button.
Convert the python program to an Executable file
For Linux
Follow these simple steps if You're using Linux.
👉Step 1: Install PyInstaller: pip3 install pyinstaller
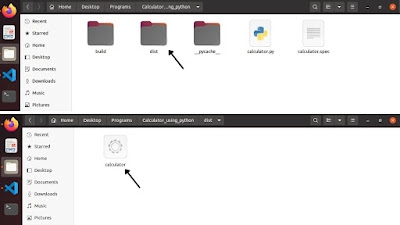
👉Step 2: Run this command in the same directory where the main python program is in: pyinstaller --onefile calculator.py
For Windows
It's almost the same as the previous example.
👉Step 1: Install PyInstaller: pip install pyinstaller
👉Step 2: Run this command in the same directory where the main python program is in: pyinstaller --onefile -w calculator.py
 |
| Image - EXE file for windows |
| Important Note |
|---|
| The file name can be anything along with the .py file. In my case, I kept the name "calculator.py". I've shared the executable files for Linux and Windows also with the main program file on my GitHub page. You can download the zip file from there through the Download button. |
👉Visit Also: File Organizer Application in Python - Tkinter Project
Summary
In this python tutorial, we build a Simple Calculator in Python. We used the Tkinter library to manage the graphical interface of this Calculator Program. In closing, we convert the python program into an executable file for Linux and Windows both.
It was a simple python project but, with it, you learned can learn to develop a GUI project using python, use of object-oriented programming(a beautiful combination of classes and objects), etc.
To get more lovely Tkinter Examples, visit the separate page created only for Python Projects. Some examples are given below.
👉Language Translator App with Python Tkinter - Google Translate
👉An Advanced Alarm Clock using Python Tkinter
👉Image to Pencil Sketch Converter in Python - Tkinter ProjectFor any queries related to this topic, please let me know in the comment section. You'll get an immediate response.
Thanks for reading!💙
PySeek


