Introduction
Have you ever sketched something on canvas with hand and pencil only? If yes, then you should know how much practice you need to get a great outcome of the result. An artist who can sketch a real-life object only with pencils gets a lot of admiration for his/her work.
But the story has become a little bit outdated. Now many computers and mobile applications offer to do the same task with an image and many of you already know how to.
But in today's lesson, first, we are gonna a python program to convert an image to a pencil sketch and later, we will make it an application by giving a beautiful User Interface so that it can be accessed by anyone even he/she is a programmer or not.
So without wasting any more time let's convert the idea into reality.
👉Visit Also: Cartoonify Yourself using this Python Application
Requirements
In this case, you do not need to install any third-party tools other than the OpenCV library. Simply type the following command to install it.
Use pip3 instead of pip for Linux.
👉Install OpenCV: pip install opencv-python
The Program
The very first thing we will do is create the main program that converts an image into a sketch. You can't imagine how simple it is. The program will follow the steps shown below one by one.
Steps
- Import the cv2 module
- Read the image through cv2.imread() function
- Resize the image(So that the image size of the result is the same visible to everyone)
- Convert the original image to Gray Image
- Invert the Gray Image by applying bitwise NOT operation
- Smooth the Invert Image using the OpenCV Median Blur method
- Again Invert the Smooth Image the same way you did in step 5
- Last or Final, apply the bitwise division method on the Gray Image(step 4) and Inverted Smooth Image(see the previous step)
Enough talk! let's do some work.
Import the module
First, create a separate folder for all the stuff we see here and create a python file with this name, "Sketch.py". Now start writing your code by importing the cv2 module.
import cv2
Read the image
Keep the image in the folder you created just before. Here, we are mentioning the path or name of the image to the cv2.imread() method. It returns a value and we will store that into the "Img" variable.
Remember, you have to mention a write path there, otherwise, the code will raise an error. You can read more about Image file reading and writing, from here.
Img = cv2.imread("sample.jpg")
Resizing
The screen sizes of every computer user may have not the similar. For example, at this current time, your screen size may not similar to mine. So, the output image may not fit every screen perfectly. To avoid any inconsistencies we will resize the image so that it looks the same for everyone.
This line of code will do that.
Img = cv2.resize(Img, (740,480))
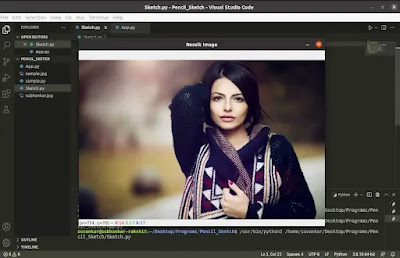
Yes! the image has resized, but how the image is looking after resizing? Let's show it.
cv2.imshow("Result Image", Img)
# Press any key to exit
cv2.waitKey()
cv2.destroyAllWindows()
Output
BGR to Gray Image
We need to convert the selected BGR image to a Gray image. The cv2.cvtcolor() method will help us. It changes the color space of the given image to another color space. We must pass two parameters to this function.
The first one('src') is for the Source Image and the second one is 'code' which takes an Integer value.
There are a lot of 'code' options and each code is represented by a unique 'int' number. Numbers are difficult to remember as compared to the name; that is why we mentioned the 'code' name "cv2.COLOR_BGR2GRAY" instead of passing the integer value of it.
GrayImg = cv2.cvtColor(src=Img, code=cv2.COLOR_BGR2GRAY)
Know more about color space conversion from the OpenCV documentation page.
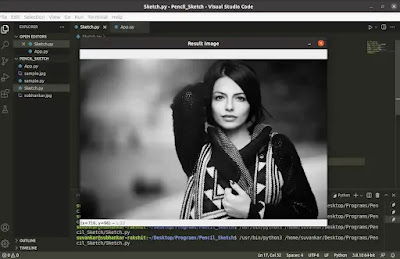
Let's display the Gray image.
cv2.imshow("Result Image", GrayImg)
# Press any key to exit
cv2.waitKey()
cv2.destroyAllWindows()
Invert the Gray Image
Perform Bitwise NOT operation on the Gray Image to flip the pixel values. In this case, cv2.bitwise_not() will take the bow. You only have to mention the source image as a parameter; here, the Gray Image would be the Source Image.
InvertImg = cv2.bitwise_not(src=GrayImg)
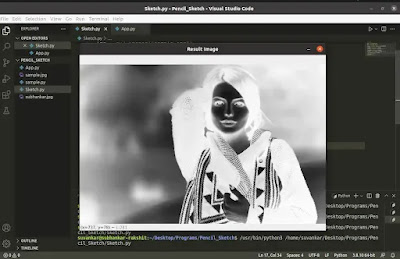
What does the Inverted Gray Image look like? Let's show it.
cv2.imshow("Result Image", InvertImg)
# Press any key to exit
cv2.waitKey()
cv2.destroyAllWindows()
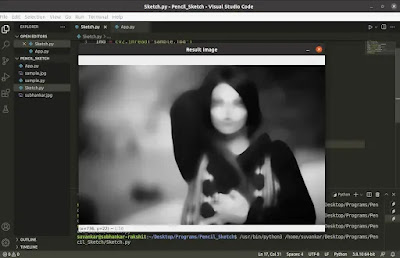
Smooth the Inverted Image
Before we apply any method to the previous images, we must reduce noise from the image we are going to work with, later. Here, the method is taking two parameters from us.
The very first one is 'src' and I already told you about it; but, here, we will pass the Inverted image(that we create in the previous step) as the source. The second is 'ksize', I chose the value 27 for it.
Remember one thing always, you only can use an odd integer value as the 'ksize'.
SmoothImg = cv2.medianBlur(src=InvertImg, ksize=27)
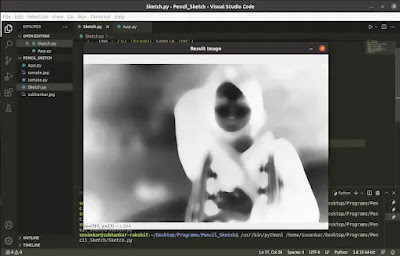
Are you impatient to see what the inverted image looks like after smoothening? Here is the code for you.
cv2.imshow("Result Image", SmoothImg)
# Press any key to exit
cv2.waitKey()
cv2.destroyAllWindows()
Invert again
Again, perform the Bitwise NOT operation. This time the Smoothed Image will be the Source Image.
IvtSmoothImg = cv2.bitwise_not(SmoothImg)
By following the consistency, let's display the resultant image again.
cv2.imshow("Result Image", IvtSmoothImg)
# Press any key to exit
cv2.waitKey()
cv2.destroyAllWindows()
Bitwise division
We are almost at the end of our program. The final operation you must perform is Bitwise division between Gray Image and Inverted Smoothed Image and the cv2.divide() method will help us in this case.
SketchImg = cv2.divide(GrayImg, IvtSmoothImg, scale=250)
Getting the result
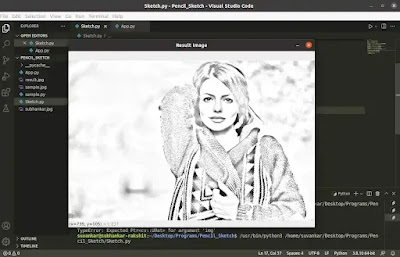
I lied a little just before. In the last step, we will display the image after applying the Bitwise division. Believe me, this is the final image. Pick the code from here and add it to the very last of your program.
cv2.imshow("Result Image", SketchImg)
# Press any key to exit
cv2.waitKey()
cv2.destroyAllWindows()
The Final Output
Finally, the Sketch Image has come out. For the image I used here, it's looking quite good. If the sketch quality is not fulfilling your requirement in your case, simply increase or decrease the 'ksize' value at the cv2.medianBlur() function.
I hope you'll find something interesting.
Save the image
You can save the resulting image using just one line of python code.
cv2.imwrite("result.jpg", SketchImg)
The Application
We developed a python program which is successfully creating a sketch of any image. But one thing is still disappointing me a lot.
Why not we transform this simple program into an application by giving a beautiful graphical interface to it? The good news is, I did it and now it can be accessed by anyone even he/she is a programmer or not.
I have used the most simple python GUI tool, Tkinter to give a beautiful interface to the application. I have added an extra feature to manage the intensity of the pencil sketch by the Tkinter Scale widget. You will easily can select the sketch quality as your requirement, by using this simple widget.
Now you have to install the Tkinter library if you don't already have it. Just type the following command in your Command Prompt or Terminal; it will be installed automatically.
Use 'pip3' instead of 'pip' for Linux.
👉Command: pip install tk
Below, the complete Source Code is given. Before copying, please take a glimpse of how to use this application.
How to use this application?
Watch the entire video to understand how the application works.
Source Code
"""An application to Convert an Image to a Sketch in Python"""
import cv2
import pathlib
import pyautogui
from tkinter import *
from PIL import ImageTk, Image
from tkinter import filedialog

class SketchImage:
    def __init__(self, root):
        self.window = root
        self.window.geometry("940x580")
        self.window.title('Sketch Creator')
        self.window.resizable(width = False, height = False)

        self.width = 700
        self.height = 440

        self.Image_Path = ''
        self.SketchImg = ''

        # ==============================================
        # ================Menubar Section===============
        # ==============================================
        # Creating Menubar
        self.menubar = Menu(self.window)

        # Adding Edit Menu and its sub menus
        edit = Menu(self.menubar, tearoff=0)
        self.menubar.add_cascade(label='Open', menu=edit)
        edit.add_command(label='Open Image',command=self.Open_Image)

        # Menu widget to cartoonify the image
        sketch = Menu(self.menubar, tearoff=0)
        self.menubar.add_cascade(label='Sketch', menu=sketch)
        sketch.add_command(label='Create Sketch', command=self.CreateSketch)

        save = Menu(self.menubar, tearoff=0)
        self.menubar.add_cascade(label='Save', menu=save)
        save.add_command(label='Save Image', command=self.Save_Image)

        # Exit the Application
        exit = Menu(self.menubar, tearoff=0)
        self.menubar.add_cascade(label='Exit', menu=exit)
        exit.add_command(label='Exit', command=self.Exit)

        # Configuring the menubar
        self.window.config(menu=self.menubar)
        # ===================End=======================

        # Creating a Frame
        self.frame_1 = Frame(self.window, \
        width=self.width,height=self.height)
        self.frame_1.pack()
        self.frame_1.place(anchor='center', relx=0.5, rely=0.5)

        # A scale widget to select the intensity of the
        # sketch quality
        self.intensity = Scale(self.window, from_=5, to=155, \
        resolution=2, orient=HORIZONTAL, length= 300)
        self.intensity.set(37)
        self.intensity.place(x=320, y=520)

    # Open an Image through filedialog
    def Open_Image(self):
        self.Clear_Screen()
        self.Image_Path = \
        filedialog.askopenfilename(initialdir = "/", \
        title = "Select an Image", \
        filetypes = (("Image files", "*.jpg *.jpeg *.png"),))
        if len(self.Image_Path) != 0:
            self.Show_Image(self.Image_Path)

    # Display the Image
    def Show_Image(self, Img):
        # opening the image
        image = Image.open(Img)
        # resize the image, so that it fits to the screen
        resized_image = image.resize((self.width, self.height))

        # Create an object of tkinter ImageTk
        self.img = ImageTk.PhotoImage(resized_image)

        # A Label Widget for displaying the Image
        label = Label(self.frame_1, image=self.img)
        label.pack()

    def CreateSketch(self):
        # storing the image path to a variable
        self.ImgPath = self.Image_Path

        # If any image is not selected
        if len(self.ImgPath) == 0:
            pass
        else:
            Img = cv2.imread(self.ImgPath)

            Img = cv2.resize(Img, (740,480))

            GrayImg = cv2.cvtColor(src=Img, code=cv2.COLOR_BGR2GRAY)

            InvertImg = cv2.bitwise_not(GrayImg)

            SmoothImg = cv2.medianBlur(src=InvertImg, ksize=self.intensity.get())

            IvtSmoothImg = cv2.bitwise_not(SmoothImg)

            self.SketchImg = cv2.divide(GrayImg, IvtSmoothImg, scale=250)

            cv2.imshow("Result Image", self.SketchImg)
            # Press any key to exit
            cv2.waitKey()
            cv2.destroyAllWindows()

    def Save_Image(self):
        if len(self.SketchImg) == 0:
            pass
        else:
            # Get the file name to be saved after making the sketch
            filename = pyautogui.prompt("Enter the filename to be saved")
            # Filename with the extension(extension of the original image)
            filename = filename + pathlib.Path(self.ImgPath).suffix
            # Saving the resulting file(self.SketchImg)
            cv2.imwrite(filename, self.SketchImg)

    # Remove all widgets from the frame_1
    def Clear_Screen(self):
        for widget in self.frame_1.winfo_children():
            widget.destroy()

    # It destroys the main GUI window of the
    # application
    def Exit(self):
        self.window.destroy()

# The main function
if __name__ == "__main__":
    root = Tk()
    # Creating an object of SketchImage class
    obj = SketchImage(root)
    root.mainloop()
The Output
Summary
In this tutorial, we built a beautiful Application using Python to Convert any Images into a Pencil Sketch in a few steps. At the very first, we create only the program for this task step-by-step. The OpenCV library plays a major role here.
Next, we built an application by giving a User Interface to that simple program. To do so, the Tkinter library helped a lot.
To get more lovely Tkinter Examples, visit the separate page created only for Python Projects. Some examples are given below.
👉Image Viewer Application using Python Tkinter
👉An Advanced Alarm Clock using Python Tkinter
👉A PDF Editor using Python (Split, Merge, and Rotate)
Hope this tutorial has fulfilled the requirements you were searching for. That's all for today, see you soon on the next topic.
Thanks for reading!💙
PySeek


