Introduction
A long time ago I created a simple Login and Registration form using Python and MySQL Database. Recently I created another login system but it is slightly different from the previous one. This is Face Recognition Based Login System using Python and MySQL.
In this case, users do not need to enter their User ID and Password during the login time but show their faces to the camera to log into the system. I've kept the project at the basic level to give you a basic idea that can help you build a large real-life project in the future.
Throughout this tutorial, I will share the journey I covered to build this face recognition login system. This will greatly help you to understand the project and use it later. So follow my every instruction step by step to launch this face recognition login system to your machine.
This is a Tkinter project connecting with the MySQL database in the back-end. So you can easily access it in offline mode. Before we jump into the core, let's have a look at the Project Details.
👉Visit Also: Test Your Typing Speed with Python - Tkinter Project
The Project Details
As I told you earlier, it's a Tkinter Project with MySQL Database in the back-end, it has a beautiful and easy User Interface to interact with.
 |
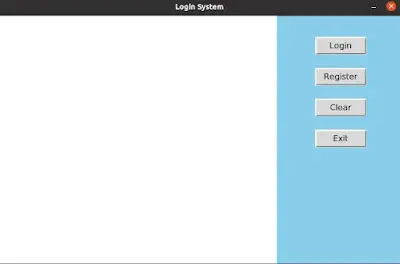
| User Interface of the Login System |
As you can see in the image above, the main window offers four buttons on the right side with different functionalities. The first button, 'Login' is for logging into the system. After pressing this button, a background voice will play saying "Please center your face before the camera and wait", after that, a window will open to capture the video stream through the webcam. If the displayed face matches with the pre-stored faces and the Face ID is present in the database, another voice will play saying "face detected", at the same time the video stream window will automatically close and the log in time will display on the screen.
The second button 'Register' opens a panel for admin login which means only an admin can register a new employee into the system and before that he/she has to login through the panel using his/her own credentials.
The objective of the next two buttons is as similar as their names. The 'Clear' button is for clearing all the widgets from the left frame and the 'Exit' is just what it does.
Requirements
The project needs some basic requirements which you must fulfill. Details are given below.
Use pip3 instead of pip for Linux and Mac.
☛Install Tkinter: pip install tk
☛Install PyMySQL: pip install PyMySQL
☛Install OpenCV: pip install opencv-python
☛Install cmake: pip install cmake
☛Install dlib: pip install dlib
☛Install face-recognition: pip install face-recognition
☛Install playsound: pip install playsound
Create a Database and Tables
To successfully launch the project in your system, first, you must create the following database, and tables and declare some default data there. I'm assuming the MySQL server is installed in your system and you know the basics.
Now go ahead step by step.
1. Create a database with this name, "employee_management"
create database employee_management;
2. Now create a table ("employee_register") under that database.
create table employee_register(
f_name VARCHAR(40) NOT NULL,
l_name VARCHAR(40) NOT NULL,
uid Int NOT NULL AUTO_INCREMENT,
email VARCHAR NOT NULL,
designation VARCHAR NOT NULL,
contact BIGINT NOT NULL,
dob DATE NOT NULL,
join_date DATE NOT NULL,
gender char(15) NOT NULL,
address VARCHAR NOT NULL,
PRIMARY KEY ( uid )
);
3. Run this command
Since we have set the user id as Integer type and Auto Increment (see the previous section), here we will set a base value for it so that the counting starts from that range.
ALTER TABLE employee_register AUTO_INCREMENT=1000;
4. Create an another table ("admin") there
create table admin(
username VARCHAR NOT NULL,
password VARCHAR NOT NULL,
PRIMARY KEY ( username )
);
5. Insert default value into the "admin" table
In this case, we are setting a user id and password for the admin of the system. You need to choose this credential as per your choice here.
INSERT INTO admin (username,password) VALUES ('your_username','your_password');
What can you learn from this Project?
- Creating a graphical interface with Tkinter: Creating a Tkinter window, frame, label, input widget, buttons, etc.
- Connecting Python to MySQL: How to connect python to MySQL, access data in a python table, retrieve data from a table, update operation, and more.
- Creating python modules to manage various tasks.
- Object Orient Programming: Use of classes, objects, etc.
- Face Recognition in Python.
- Working with MySQL database using python programming.
The Source Code
Download the source code from my GitHub page(https://github.com/subhankar-rakshit) through the download button.
Output
This video will help you to run this project properly on your system.
Summary
In today's lesson, we discussed about a Face Recognition Login System which is developed using the Python Tkinter library and MySQL Database. Users can log in to this system by showing their faces in front of the camera instead of typing their User id and Password. One more feature is there; the Admin can register a new employee through this Login System.
I have covered here every single step that will help you to execute this beautiful project properly. To better understand how this face recognition login system works I would suggest you read the entire article as well as Watch the Output Video above so that you don't miss any point.
There are more related python projects with complete guidance. Some of those are given below.
👉A face recognition based attendance system using Python
👉Student Management System Project in Python with MySQL
👉Library Management System Project in Python with MySQL
👉 Contact Management System Project in Python with MySQL
For any query related to this project, please don't hesitate to leave your comment below. You will get a reply soon.
Thanks for reading!
PySeek

